Exercise 2: Create the UI for a Xamarin.Forms calculator
Lab goals
In this exercise you will modify your Xamarin.Forms application and replace the existing UI code with a new user interface to input two numbers and a button to perform a calculation with those numbers. If you use the lab instructions, your UI will look something like: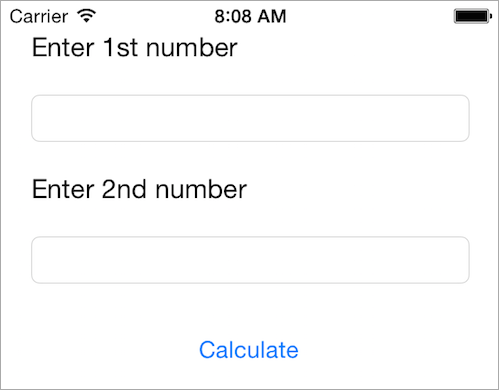
To complete this exericse, you will perform the following steps:
- Remove the existing code from the constructor method in App.cs. Recall that this file might be named Calculator.cs if you created the project in Visual Studio.
- Create a new
ContentPagewith the Content set to aStackLayoutto hold your UI elements. - Add a
LabelandEntryto prompt and get the 1st number. - Add a second
LabelandEntryto prompt and get the 2nd number. - Add a
Buttonwith the Text "Calculate" - Return the creted
ContentPage.
Steps
Try to use the picture and above steps to complete the lab exercise, referring to the slides if you need any help in creating the UI. You can also use the following step-by-step instructions to fill in any knowledge gaps.
Delete the existing code
- Open the App.cs file in the portable project - this is the first project in your solution and is the one you will do all your work in.
- In this file you will find the definition for an App class which has a constructor method. This is what Xamarin.Forms calls in order to create the single screen in the application
- it's currently a
Labelwith some text.
- it's currently a
Go ahead and delete the code in the method - leave the constructor method definition itself, just remove the contents:
using Xamarin.Forms;

namespace Calculator
{
  public class App : Application
  {
    public App()
    {
      // The root page of your application
      // All the code in this method has been removed.
    }

    ...
  }
}
Add in a ContentPage and StackLayout
Each screen in your application is a Page. Most of the time, you will use a ContentPage to provide the screen - this allows for a single piece of content in the form of a visual element. Here, we will create the ContentPage and set it's content to a StackLayout.
- In the App constructor method, create a new
ContentPageobject and assign it to a variable - name it page. - Next, create a new
StackLayoutobject - remember these are used to organize children in rows or columns. We will use the default layout of rows (vertical), but you can change that if you like by setting theOrientationproperty. - Assign the
StackLayoutto a new variable namedlayout. - Set the page.Content property to be your
StackLayoutvariable. - Assign the page to the
MainPageproperty - this assignment is what will tell Xamarin.Forms to use this page as the main screen. - Build (and run) the program. It should display an empty screen.
- Next, let's give it a little visual tweaking. Set the following properties on the
StackLayout, try using theproperty-initializersyntax!: Padding = 20 Spacing = 20 These will adjust the padding around the page and the spacing between any children added to the StackLayout. - Build and run the app again - it should now have a gray background.
public App()
{
    ContentPage page = new ContentPage();

    StackLayout layout = new StackLayout() {
        Padding = 20,
        Spacing = 20
    };

    page.Content = layout;

    MainPage = page;
}
Add in your child views
Next, let's add in the views to show and collect our required data. Remember, we want our UI to look like this:
- Create a new
Labeland set theTextproperty to "Enter 1st number", assign it to avariablenamedlabel. - Add the
labelinto theStackLayoutwith the following code:Label label = new Label() { Text = "Enter 1st number" }; layout.Children.Add(label); - Create and add an
Entrycontrol to theStackLayoutusing the same basic code. - Add a second
Labelwith the text "Enter 2nd number" and a secondEntryinto theStackLayout. - Finally, add a new
Buttonwith the text "Calculate" to theStackLayout. - Build and run the application and verify the app looks like the screen shown above.
public App()
{
    ContentPage page = new ContentPage();

    StackLayout layout = new StackLayout() {
        Padding = 20,
        Spacing = 20
    };

    layout.Children.Add(new Label() {
        Text = "Enter 1st number"
    });

    Entry firstNumber = new Entry();
    layout.Children.Add(firstNumber);

    layout.Children.Add(new Label() {
        Text = "Enter 2nd number"
    });

    Entry secondNumber = new Entry();
    layout.Children.Add(secondNumber);

    Button calcButton = new Button() {
        Text = "Calculate"
    };

    layout.Children.Add(calcButton);

    page.Content = layout;
    MainPage = page;
}